
Ticketing System using Microsoft Office Apps
Today, I’m excited to share a new project with you a SharePoint-based ticketing system. If you’re like me, you’ve spent countless hours building and maintaining complex systems using SharePoint as the backend.
While SharePoint is great for storing documents and records, creating a fully functional ticketing system in SharePoint is a complicated and time-consuming process.
Most organizations start with a Minimum Viable Product (MVP) and build out the system from there, with little to no regard for scalability or future needs.
Fortunately, there is an easier way: use Power Automate and Forms to build a scalable, customizable, and robust ticketing system. Using the power of automation and the Forms feature in Power Automate, I was able to build a modern ticketing system in SharePoint that’s simple to use and easy to scale.
This will allow you to create, approve, update, send notifications and close tickets in SharePoint with just a few clicks. You can customize the look and feel of the system to match your brand, and add additional functionality as needed.
SharePoint Ticketing System Overview
An end to end ticketing system with approval process and that can be used by multiple users within the organization for submitting their support queries.
This ticketing system should be able to provide automatic Status updates and visibility towards the tickets submitted by them anytime.
Support team should be able to open the tickets, work on it, update status, add comments and close the ticket.
Required Microsoft Office Apps
- Microsoft Forms
- Microsoft OneDrive
- Microsoft Power Automate
- Microsoft SharePoint
- Microsoft Outlook
- Microsoft Lists
- Microsoft Teams (Optional)
Please check your Office 365 portal to make sure you have access to the required apps.
Terms Frequently Used In This tutorial
Okay, now let’s get familiar with some of the below terms, as we will be using it more frequently through out the development process.
- Forms: Microsoft Forms
- Submitter/Responder/User: Person who submits the Ticket (Responder to the Forms)
- Response: Data submitted through the Forms (Information that will be used for the Ticket creation)
- Approver: Person who approves the Response before moving it to the SharePoint List as a New Ticket.
- SharePoint List: A List that contains all the Tickets with unique ID (Ticket No.)
- SharePoint List Item/Item: A single Approved Response (Ticket) in the SharePoint List.
How to Create a Ticketing System in SharePoint :
Below is the Process Flow for how this SharePoint ticketing system works. Then followed by a detailed step by step instructions on what we are going to do to make this ticketing system work.
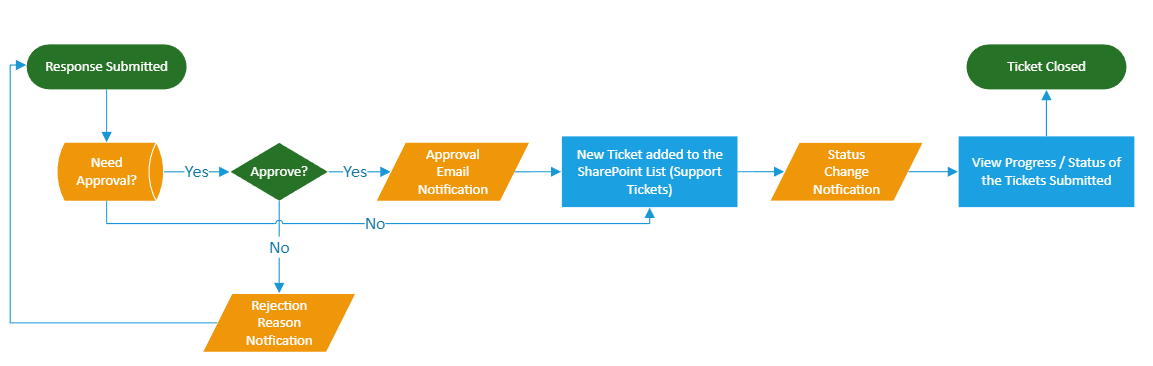
3 Major components of the ticketing system:
- Microsoft Form (Frontend)
- SharePoint (Backend)
- Power Automate Workflow (Automation & Integration)
Ticketing System: Power Automate Development Flow
Please note that, you do not need to have any prior programming skills to build this ticketing system. Please follow the instructions below and you will be able to build this.
1. Microsoft forms with attachments
Create a Microsoft Form with all required fields like, Ticket Title, Issue Description etc. along with an ‘Attach File’ Option. This will serve as the Front End of our Ticketing System, where users can fill in all the information required to create a ticket.
For this example name the Form as ‘Support Ticket‘
How to create Microsoft forms with attachments
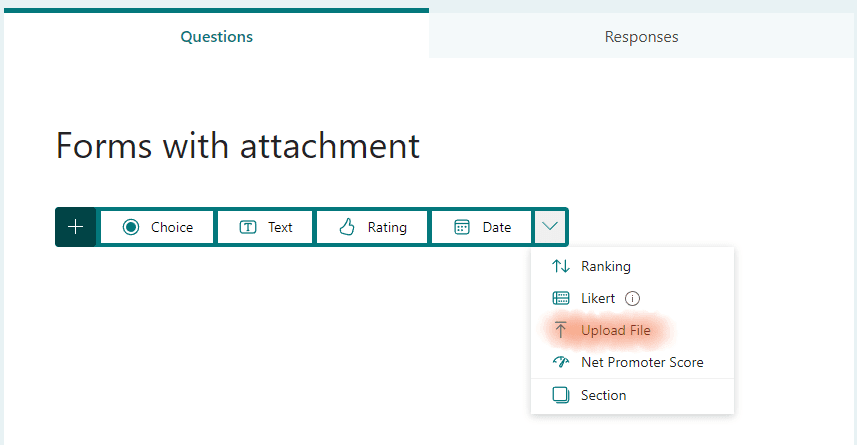
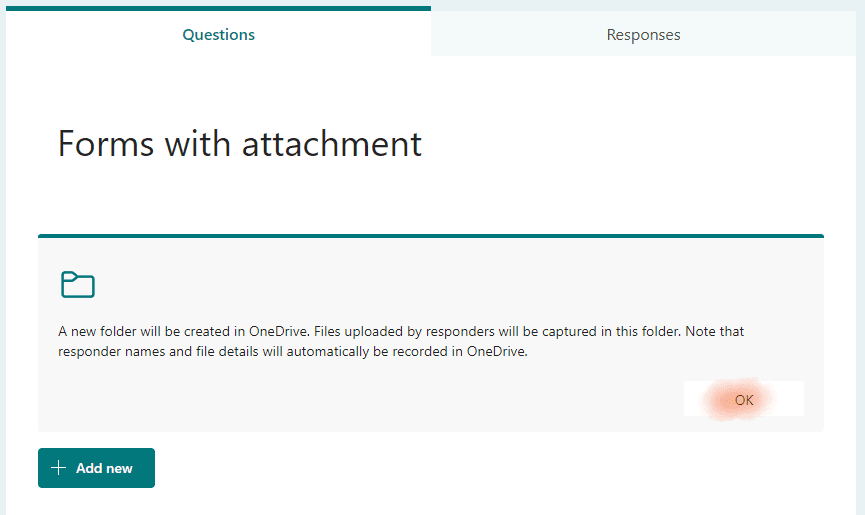

- Click Add new.
- Click the drop down menu for additional options (if file upload is not shown)
- Click on file upload.
Below is an example video shows how to create Microsoft Forms with attachments.
2. Create SharePoint Lists
Create Two SharePoint Lists. One for storing all tickets (Eg.: ‘Support Tickets‘), this list should contain all corresponding Columns/Fields same as in the Form.
Then create another list with the all people who can submit the ticket (Eg.: ‘Ticket Submitters‘) and if they need approval from their manager – Yes or No.
 Pin
Pin How to create sharepoint list
- Select Settings. …
- Select + New, and then select List.
- Enter a Name for the list, and optionally, a Description. …
- Select Create.
- When your list opens, to add room for more types of information to the list, select + or + Add column.
3. Microsoft forms approval workflow
Create a User specific Approval Process for the responses submitted through Forms.
In this example we are creating an Approval process where ‘some users require approval from manager‘ and ‘some do not require approval‘ before it being saved to the SharePoint List (submitted to the Support Team).
How to create a Power Automate Workflow for Ticketing System
Follow the below steps to create the Power Automate workflow to automate the ticketing system.
- Go to Microsoft Power Automate and
- Click on + Create
- Select Automated cloud flow
- Add a name for your flow Flow name
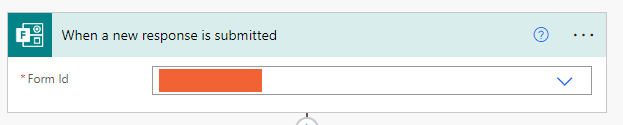
- Choose a flow trigger, in our case ‘When a new response is submitted‘ Microsoft Forms
This is the first step where we are asking the power automate to starting the process whenever someone submits a New Response/Ticket to the Form.
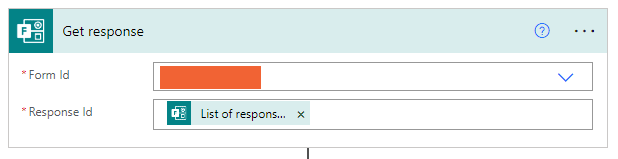
Select the Form Id which is the name of the Form (Support Ticket)
- Add Action ‘Get response‘ details from the Form
Now we are asking power automate to get all the details from the response submitted by the user through the Form
 Pin
Pin - Add Action ‘Get items‘ from the SharePoint List ‘Ticket Submitters‘
At this step we are asking Power Automate to Get items from a Sharepoint List ‘Ticket Sumbitters’ and checking it against the Form Responders’ Email Id
 Pin
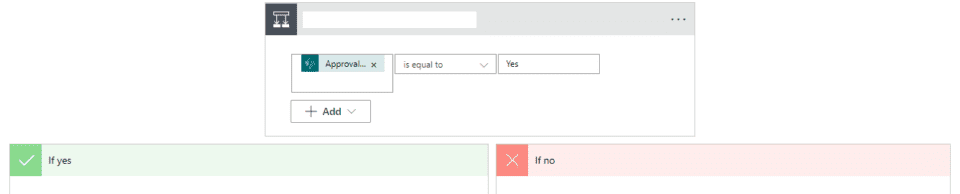
Pin - Add a ‘Condition‘ Check if Approval required is equal to Yes or No
Here we are checking whether the Responders’ email Id has been marked as Approval required Yes or No from the ‘Ticket Submitters‘ List
 Pin
Pin - If Yes :
4. Power Automate Approval Flow
Now we will create a set of actions that need to be followed since the Approval status is equal to Yes
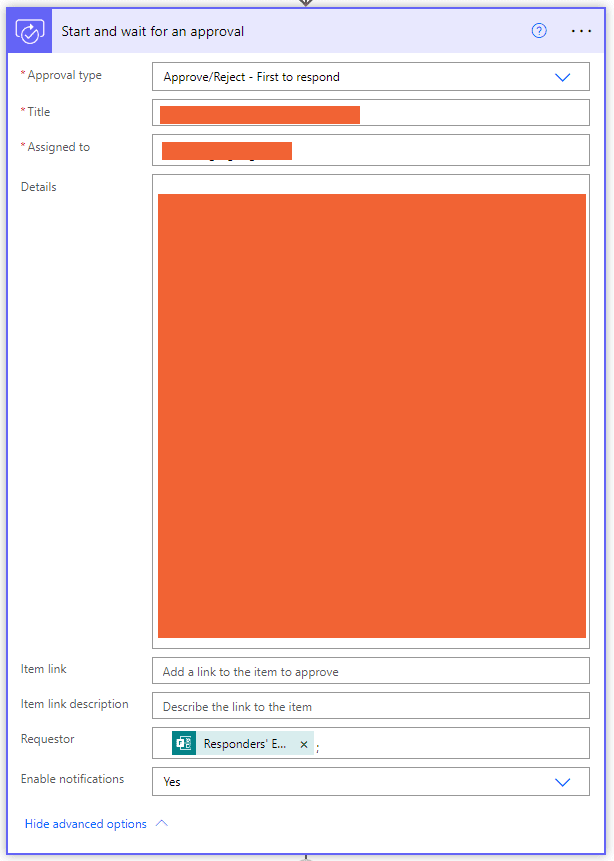
- Start Microsoft forms approval workflow action ‘Start and wait for an approval‘
Since this responder was marked as Approval Yes, we are starting an Approval flow here, where the Power Automate will send an Approval request email to the Approver (Responder’s manager)
Approval Type: Approve/Reject – First to respond
Title: Subject of the approval email
Assigned to: Approver/Manager’s email id
 Pin
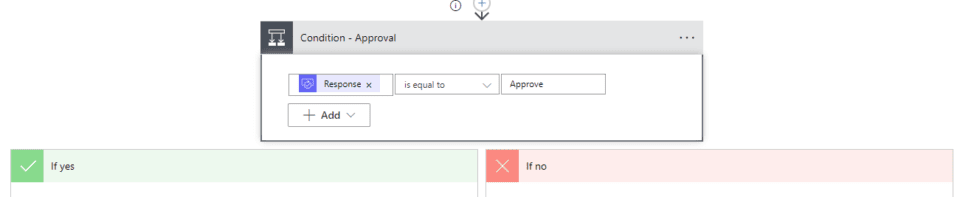
Pin - Add another ‘Condition‘ to check Approval status
Now we are adding another condition to check the Response of the manager, whether the manager Approve the request or Reject it.
 Pin
Pin - If Approve
Now will create another set of actions If the the Response is Yes
5. Microsoft forms to SharePoint List
- Add Action ‘Create item’ in SharePoint List
 Pin
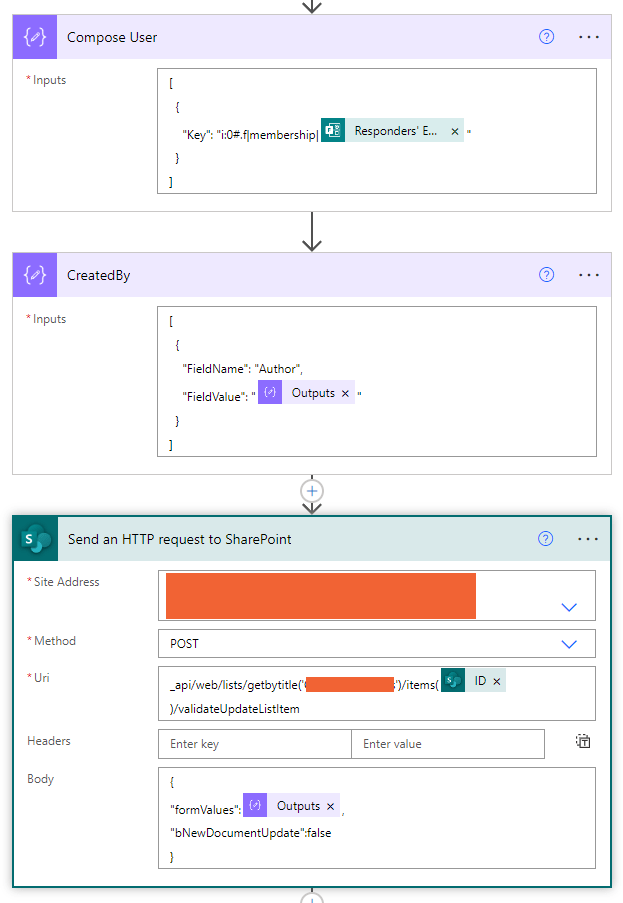
Pin 6. Change 'Created by' In SharePoint List
- Change ‘Created By’ using Send HTTP request to SharePoint
‘Created by‘ is a default field in SharePoint which corresponds to the person who created that particular item.
In our case item is not manually created, it is being created by the Power Automate Flow using the information from the Forms.
So while creating a new Item in the SharePoint List we will modify the Value for ‘Created by’ in SharePoint using some JSON code. Don’t worry about the JSON code, its not rocket science, I will exactly show you how to do it and provide you the JSON code also.
SharePoint automatically takes SharePoint Owner ID (basically the creator of the SharePoint List) as the Value for ‘Created by’ but we need to have this changed to the Submitter of the Ticket.
By doing this you can provide access to the Submitter to this SharePoint List and they can see the information of all the tickets submitted by them anytime. For this we need to enable ‘Item-level Permission’ on the SharePoint List from List Settings, and provide ‘Read Only’ access, so that they will see only tickets submitted by them and not by the others (“Read items that were created by the user”).
 Pin
Pin JSON Code Compose User
					[
  {
    "Key": "i:0#.f|membership|@{outputs('Get_response')?['body/responder']}"
  }
]
JSON Code CreatedBy
					[
  {
    "FieldName": "Author",
    "FieldValue": "@{outputs('Compose_User_2')}"
  }
]
Uri – Send HTTP request to SharePoint
_api/web/lists/getbytitle('Support Tickets')/items(@{outputs('Create_item_2')?['body/ID']})/validateUpdateListItem
Body – Send HTTP request to SharePoint
					{
"formValues":@{outputs('CreatedBy')},
"bNewDocumentUpdate":false
}
7. Microsoft Forms Attachments To SharePoint List
As I have mentioned in Step 1, we will create a Form with “Attach File” option. This will enable the user to attach any file or documents while submitting the Form.
For example, Error Screenshot, An Excel file, PDF document etc.
This will help the Support team and anyone who has access to the List to see the attachments right from the SharePoint List and open it by click of a button.
By default Microsoft Forms saves all attachments submitted through the Forms in the OneDrive. And the attachments won’t be automatically saved to the SharePoint List while a new Item is created in the SharePoint List.
We need to have this extracted from OneDrive and attach to the list by passing a JSON code. As I mentioned earlier don’t worry about the JSON code, I will exactly show you how to do it and provide you the JSON code also.
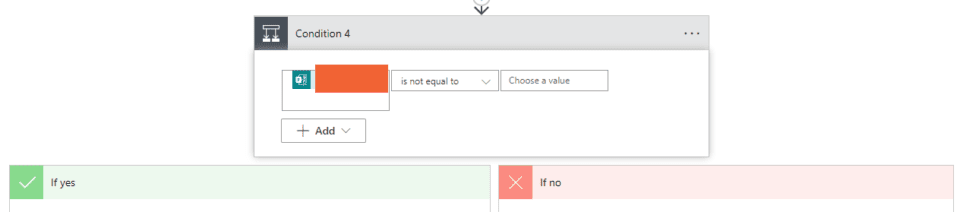
- Add another Condition to check if there are any Attachments to the Form
Add the Form field to the Condition, in our case ‘Upload Attachments‘ and check is not equal to blank
 Pin
Pin - If Yes
The Condition is not equal to blank – True means Contains attachment, then need to start the process to extract the file from the OneDrive location and attach it to the SharePoint List
- Get the file from OneDrive and Attach to the SharePaoint List Item
 Pin
Pin 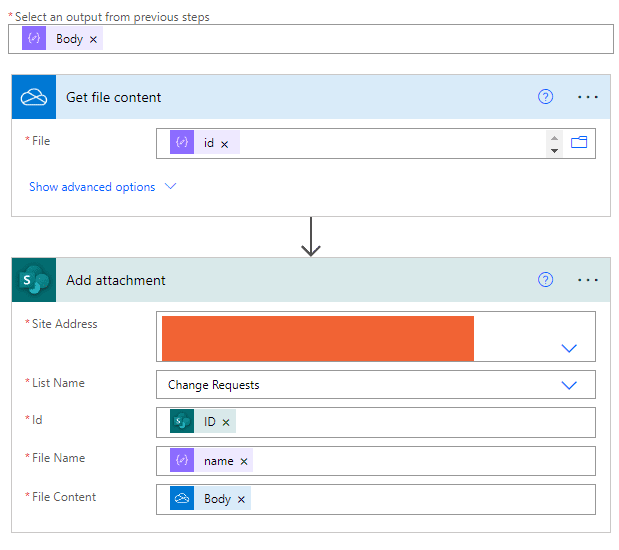 Pin
Pin Below video shows the detailed process that you can follow to do this step.
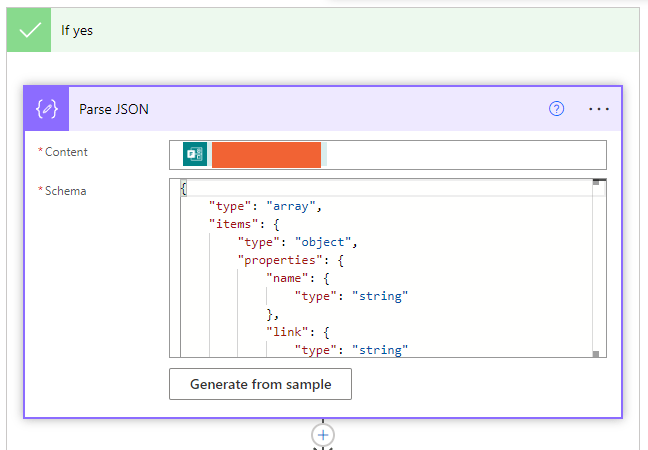
Parse JSON Schema code for the Power Automate Microsoft Forms Attachments To SharePoint List
					{
    "type": "array",
    "items": {
        "type": "object",
        "properties": {
            "name": {
                "type": "string"
            },
            "link": {
                "type": "string"
            },
            "id": {
                "type": "string"
            },
            "type": {},
            "size": {
                "type": "integer"
            },
            "referenceId": {
                "type": "string"
            },
            "driveId": {
                "type": "string"
            },
            "status": {
                "type": "integer"
            },
            "uploadSessionUrl": {}
        },
        "required": [
            "name",
            "link",
            "id",
            "type",
            "size",
            "referenceId",
            "driveId",
            "status",
            "uploadSessionUrl"
        ]
    }
}
- If No
What if the The Condition is not equal to blank – False means the Form submission doesn’t contain any attachment, in that case you don’t need to add any action under the If no section and leave it blank.
The List Item will be created without any attachment.
9. Microsoft forms Approval email notification
Now that the ticket has been successfully created after approval from the manager in the SharePoint List as a New SharePoint List Item with a unique Ticket No, we can send an automatic email confirmation to the requester.
10. Power Automate send email from shared mailbox
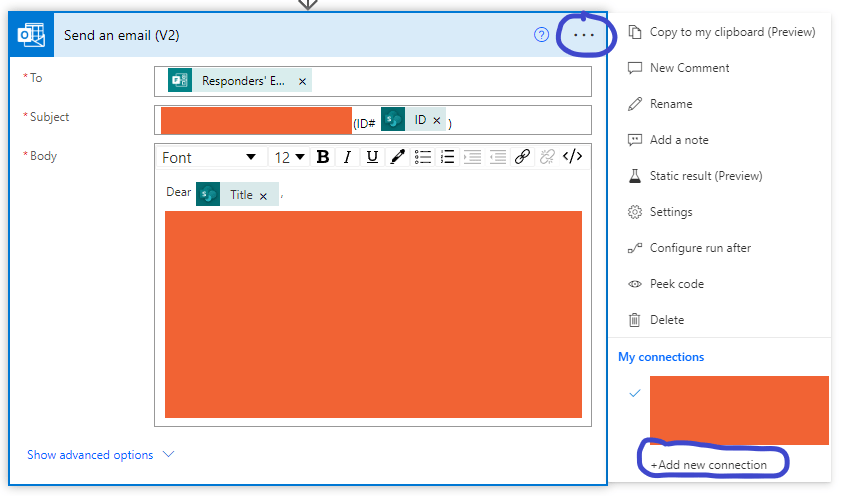
An automatic E-Mail notification will be send to the Submitter from a Generic Mailbox to confirm the successful Submission of the Ticket. We will configure the Power Automate to send email from a shared mailbox and not from the person who created the flow.
Instead of using the Personal Email ID ([email protected]) of the flow creator, use a generic mail box ([email protected]).
- Send Microsoft forms approval email to the User
- Add action Send an email (V2)
- Click the three dots at the right side.
- Under My connections add the Generic Mailbox from which you want to send the email
- To: Form field ‘Responder’s Email’
- Subject: Add the subject for the email
- Body: Add mail content in the body section
 Pin
Pin 11. Microsoft Teams alert from SharePoint list
- Add Action ‘Post adaptive card in a chat or channel‘
Notify the team Members via Teams about the New ticket when a new item is created in a SharePoint List. So that they can be aware of the new Ticket and start working on it.
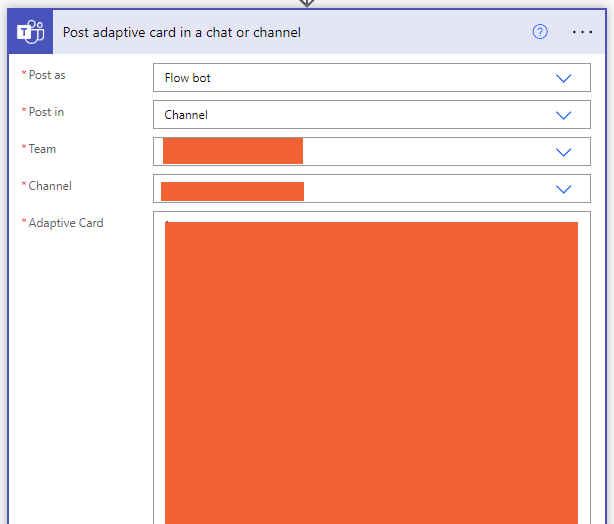 Pin
Pin When a Condition is used the result can be True or False (If yes and If no).
IF Yes — Do something
IF No — Do Something Else
So in our case we used 1 condition at Step 3 (To check Submitter requires Approval Yes or No) and another Condition at Step 4 (What happens if the Approver Approves or Rejects the response).
So far we have created Power Automate Actions for when the condition is ‘IF YES’ for Step 3 & Step 4. Now below 2 steps are for creating the steps when condition scenario is ‘IF NO’.
Please refer back to the Power Automate Flow Structure shown at the beginning of this tutorial under the section How To Create SharePoint Ticketing System using Power Automate, to understand complete development structure of this ticketing system.
12. Microsoft forms Rejection email notification
- If Rejected (Step 4)
This step now goes back to the Condition – Approval (What happens if the Approver Approves or Rejects) which we mentioned in the Step 4. All the above mentioned configurations we did from Step 4 to Step 11 are for the scenario in case when the manager approves the request.
Now we need to configure what happens when the manager Rejects the request.
- Send Microsoft forms Rejection notification email to the User
If Approver Rejects the Response then the Submitter/User gets an automatic E-Mail notifications with Comments from the Approver for the rejection reason.
The setup of the Rejection email is same as the process explained in Step 10
- Under the If no (Step 4) add a new Action Send an email (V2) and configure it same as in Step 10, only need to modify the Subject and the comments in the Body section to notify the rejection reason.
13. Update SharePoint List From Microsoft Forms
- If No (Step 3)
This step goes back to Step 3 where we checked for the Condition Is Approval Required Yes or No. All configurations we did from Step 4 to Step 12 are for the scenario if the Submitters requires Approval Yes.
Now we need to add actions for the scenario No, that means when the Submitters doesn’t require an Approval from manager.
Responses submitted by Users who Doesn’t Require Approval gets saved directly to the SharePoint List as a New SharePoint List Item with a unique Ticket No, without going through the Approval Flow (Step 4).
We simply need to replicate the same Actions from Step 5 to Step 11 as it is under the section If no from the Approval Required condition from Step 3.
Summary: Power Automate Flow First Trigger
- When a new response is submitted:
So that brings us to the end of First Section of the Ticketing System Power Automate Flow. Once configured correctly as explained above then your completed Power Automate Flow should look something like the below:
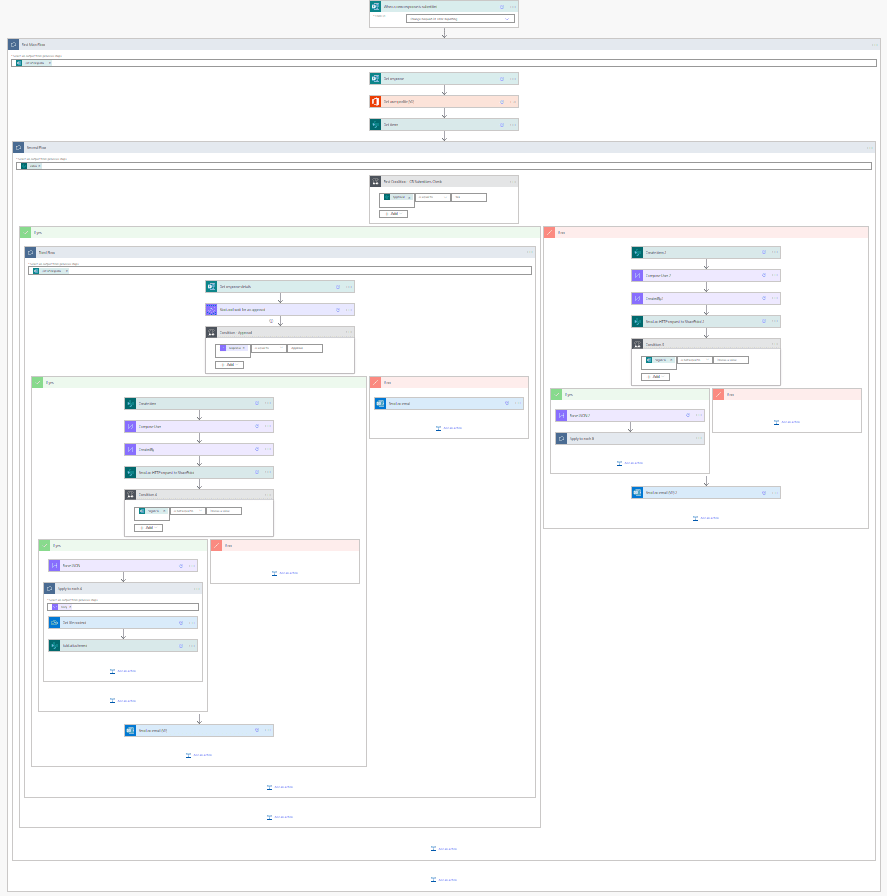 Pin
Pin 14. Send email when specific field changes in SharePoint List
This is the Second section of the Flow Development and this will enhance the overall user experience with the Ticketing System.
This is more like a status update to the end user whenever there is an update in the Tickets submitted. There are 2 ways to configure it,
Either user gets notification email whenever there is a change in any Column values in the SharePoint List.
Or
Update the user only when a specific Column value changes in the SharePoint List, for example Column value for Ticket Status changes From New to In Progress or In Progress to Completed etc.
- Send email when specific field changes in SharePoint using flow
In our example we are looking into the second scenario where users will be notified when the ticket Status changes.
This Section need to be Created as a separate New Flow and not in continuation to the First Flow. Because:
The automatic trigger to start the flow here is ‘When an existing item is modified‘ where as in the First Section the automatic trigger to start the flow was ‘When a new response is submitted‘ in the Microsoft Forms.
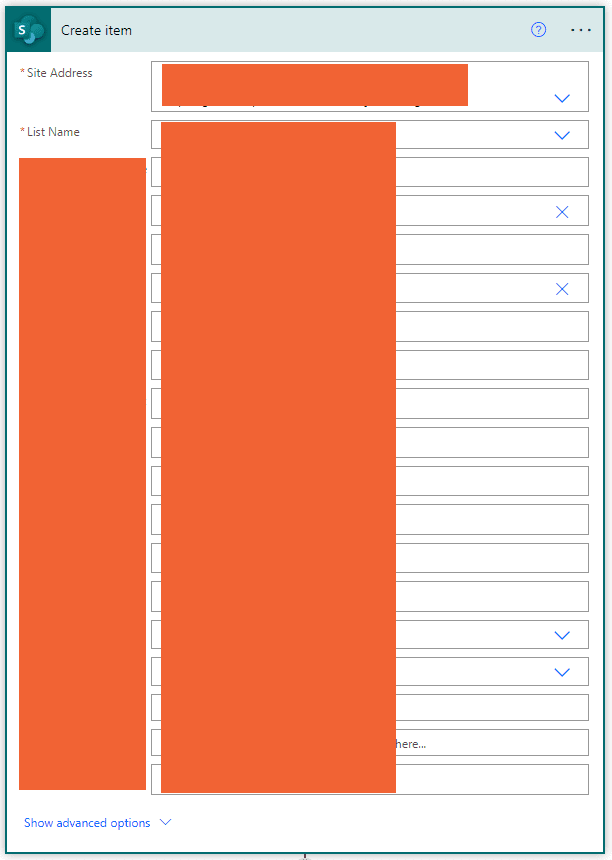
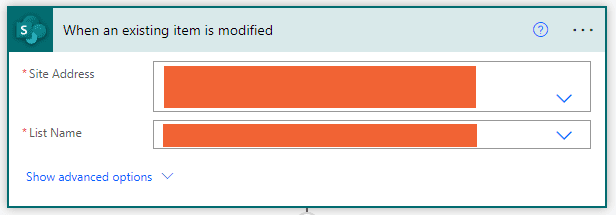
- Start trigger ‘When an existing item is modified’
Site Address: From the drop down list select the SharePoint site address where the Lists are created.
List Name: Select the name of the List where the tickets are saved, in our case ‘Support Tickets‘
 Pin
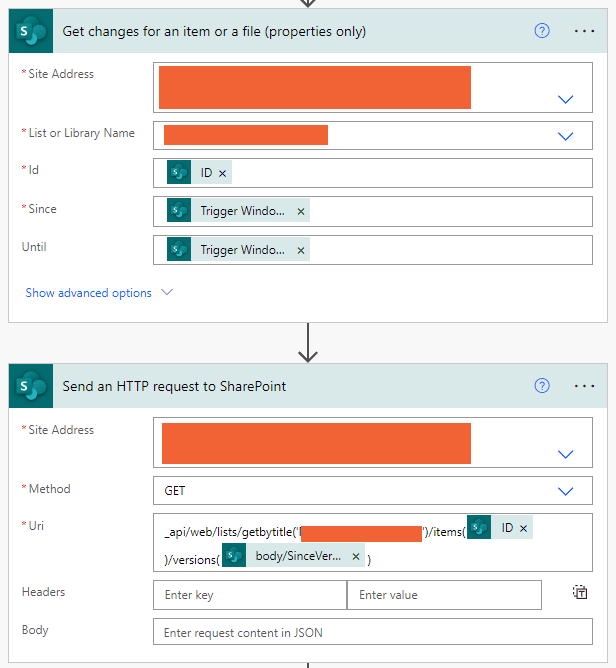
Pin - Get changes for an item or a file (properties only)’
 Pin
Pin - URI – Send an HTTP request to SharePoint Action
					_api/web/lists/getByTitle('Support Tickets')/items(@{triggerOutputs()?['body/ID']})/versions(@{outputs('Get_changes_for_an_item_or_a_file_(properties_only)')?['body/SinceVersionId']
})
- Check if certain column value changed from the previous version
 Pin
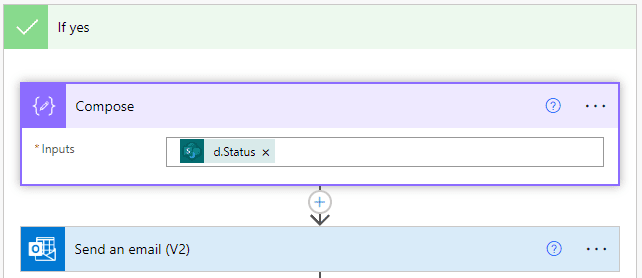
Pin - If Yes: If the column value changed equals True (Changed)
- Send modification details to the User with details of what was changed.
 Pin
Pin - Compose – Inputs: To get the previous value of Status from the HTTP request
body('Send_an_HTTP_request_to_SharePoint')['d']['Status']
- If No: If the column value changed equals False (No Changes)
Ignore and No action required
Below video explains in detail on how to send email when specific column value changes in SharePoint List
Summary: Power Automate Flow Second Trigger
- When an existing item is modified:
So if you have configured correctly then your flow should look something like the below.
 Pin
Pin That covers all the steps that you need to follow to to Create a Ticketing System in SharePoint with Power Automate and Forms.
If you are interested to Learn and Improve your Microsoft Power Automate Development skills then I would recommend you to Join the below Complete Guide to Microsoft Power Automate Course.
It will be a worth investment! And Right Now you can register with upto 80% Off
(Only when you click and join from here ⇊)


This course starts from the basic level, so no prerequisites are required.
Automate all your tasks using Microsoft Power Automate (Microsoft Flow) with the complete guide (from basic to advanced).


23 Responses
I’m using the MS list template to capture and log IT tickets. I noticed that when I reply to the recipient it creates a new list item instead of updating the existing item need your help to create the flow in powerauto mate.
I’m using the MS list template to capture and log IT tickets. I noticed that when I reply to the recipient it creates a new list item instead of updating the existing item
Help, I am trying to follow your directions but when I load the page, your table of contents and videos never load, I don’t think it’s a firewall issue on my end because the same thing happens when I try to connect on my phone.
Hi, Please clear your browser cache and reload the page again!
Can we add a step to add more informtation when approved or rejected?
Hi, Yes, it’s possible to add more information based on the Approve/Reject decision!
Please help me with this flow
1. Request ID: Assign a unique ID for each request for easy tracking.
2. Request Type: Indicate the type of request (e.g., New Joiner Emailer, Birthday Collage, Business Card Design).
3. Requested By: Name of the person from the HR team who made the request.
4. Date of Request: The date on which the request was made.
5. Required By Date: The deadline for the request, based on the turnaround time standards.
6. Details Provided: A checklist of the details provided (e.g., Resume, Photograph, Designation for New Joiner Emailer).
7. Additional Information Required: Any additional information needed from HR.
8. Date Sent to MarCom: The date when the request was sent to the Marketing Communications team.
9. MarCom Acknowledgement Date: The date when MarCom acknowledged the request.
10. Draft Prepared Date: The date when the draft was prepared by MarCom.
11. Date Sent to DoodlSpace: The date when the draft and references were sent to agency.
12. Design Received Date: The date when the design was received from agency.
13. Final Review Date: The date when MarCom completed the final review.
14. Date Sent to HR: The date when the final design was sent to the HR team.
15. Feedback from HR: Any feedback provided by the HR team for future improvements.
16. Status: Current status of the request (e.g., In Progress, Completed, On Hold).
17. Comments: Additional comments or notes related to the request.
Is there a way to generate response form from an email address? For example, I want to allow a customer to send an email to a support email address that when sent would automatically generate a response form in SharePoint that would ultimately result in a ticket.
Hi Russell,
Yes, it’s possible to create a SharePoint list item based on the email received Trigger!
On my second test run, I got an error for the “Send an HTTP request to SharePoint” step. The details are as follows:
The property ‘Key’ does not exist on type ‘SP.ListItemFormUpdateValue’. Make sure to only use property names that are defined by the type.
clientRequestId: bcba2d7e-d54d-47b2-9b7e-3b9e67f5acc3
serviceRequestId: 7adbbaa0-50f0-0000-17cf-88eaf43ad0a8
I suppose I can make due without changing the “created by” value, but I’d like it to run as intended. Any suggestions for this one?
Nevermind. I got this one resolved by redoing the HTTP Body JSON and verifying that it was pointed to the CreatedBy Output
I’m getting an error message for this Flow on the third (Create item) step. Error message is as follows:
The ‘inputs.parameters’ of workflow operation ‘Create_item’ of type ‘OpenApiConnection’ is not valid. Error details: The API operation ‘PostItem’ requires the property ‘item/Pleaseattachsupportingdocuments’ to be a string of maximum length ‘255’ but is of length ‘534’.
What do I do to extend the string length or otherwise resolve this error?
I finally figured this one out. I had to go into the list settings in SharePoint Online and change it to “multiple lines of text.” That resolved the issue with adding attachments.
I’m wanting to set something like this up for incoming client help requests – is there anything I need to consider for it to work for external users?
can we skip the approval process? i need flow
when new respon submited => generate unique code => mail to responders & me
Hi Anson, Can you please upload a high resolution of summary flow
Many thanks for sharing the information on all your work.
My kind request is the same as Joel’s, any chance we can see an enlarged picture of the Summary flow?
Would be a great help for everyone to check against own flow creation.
I am echoing Joel’s request, any chance we can see an enlarged picture of the Summary flow?
Great job with this, very helpful.
here for the same thing, please let me know
Hey there,
Could you possibly post or share a larger image of your completed flow?
I’m trying to follow along and create this – specifcally step 6 “6. Change ‘Created By’ In SharePoint List” . Where does that condition go? As well for the add attachment.
Thank you, love this blog post!
it happens me too, I got stuck in CreatedBy and Compose User part 🙁
Hi Patrick, You need to pay attention to all the minute details mentioned in the article, please let me know where you are stuck so maybe I could help. 🙂
I would love to hear how it worked out for you because I can hardly follow these instructions. Not detailed enough unfortunately.